
Megan Callahan, Skincare Editor.
You know the moment. Three days into a gel manicure that cost real time and effort, and the edge of your thumbnail has already lifted into a tiny white flag of surrender. You scroll past another ad promising a miracle top coat, but the bottle in your hand is the same one a salon tech used last month, and it worked fine then. The truth drugstore shelves rarely tell you: most chipped gel has nothing to do with the polish itself. A 2021 study in the Journal of Cosmetic Science tracked gel failure points and found that application technique, not formula, accounted for the majority of early lifting in at-home manicures. This guide walks through the technique differences that actually matter, using the gel polish already sitting in your bathroom drawer.
- Dehydration beats expensive formula: a nail wiped with isopropyl alcohol before polish holds gel longer than a pricier top coat applied to a damp or oily nail.
- Thin coats cure all the way through: a gel layer that looks dry on the surface can still be soft underneath, which is the hidden cause of early peeling.
- Capping the free edge doubles wear time: sealing the very tip of the nail, not just the top, is the single habit that separates three-day manicures from three-week ones.
Why Gel Lifts Before Day Three
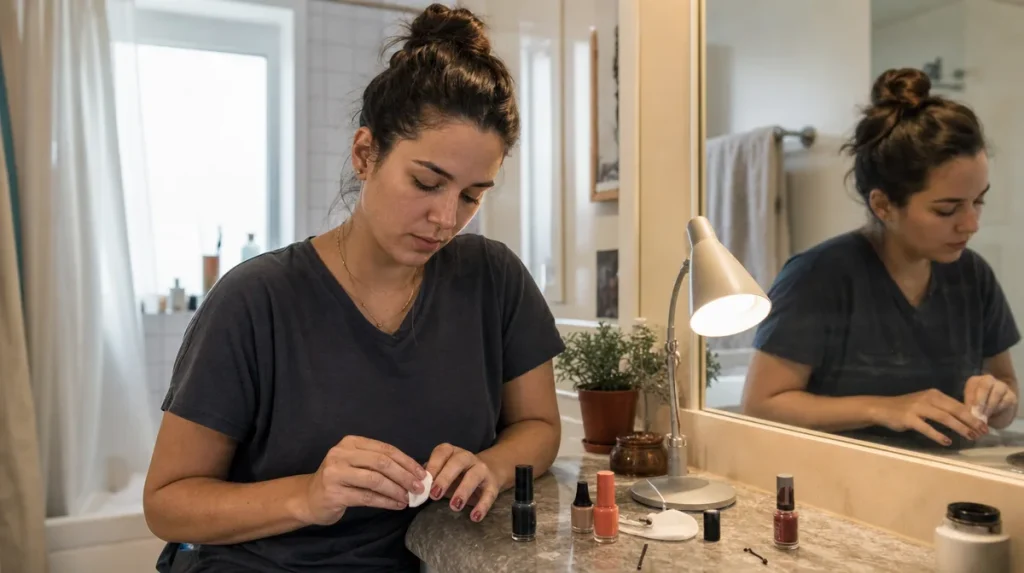
Gel polish bonds to the nail plate the way tape bonds to a wall. Tape sticks beautifully to a clean, dry surface and barely at all to one dusted with flour or slicked with grease. Your nail plate carries natural oils and a thin layer of moisture, and cuticle cream or hand lotion applied earlier in the day adds more. None of that is visible, which is why a manicure can look perfectly prepped and still fail within days.
Salons address this with a dehydrator, usually a swipe of isopropyl alcohol or a dedicated nail prep pad, applied directly before the base coat. At home the same result comes from wiping each nail with a cotton pad soaked in rubbing alcohol, letting it flash dry for a few seconds, and touching the nail plate as little as possible afterward. Oil from fingertips transfers fast.
The American Academy of Dermatology’s general nail care guidance notes that nails absorb and lose moisture more readily than skin, which is part of why a freshly washed or lotioned hand is a worse canvas than a dry one. A quick self-test: press a clean nail against a piece of plain paper. If it leaves any visible sheen or mark, there is still oil on the surface, and the gel will have less to grip.
Curing Light Math: Why Thirty Seconds Isn’t Always Thirty Seconds
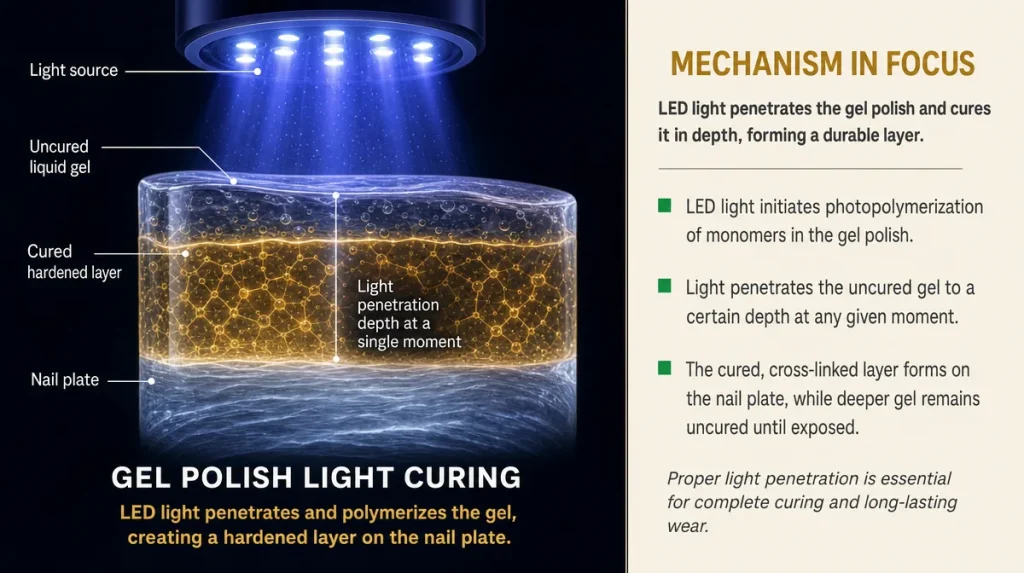
LED and UV lamps cure gel by triggering a chemical reaction in the polish, turning it from a liquid film into a hardened plastic-like layer. The lamp’s timer is a guess, not a guarantee, because the actual cure depends on how much light actually reaches the gel. A nail held at an angle, a hand positioned too far from the bulbs, or a lamp with aging bulbs all mean less light lands on the polish than the timer assumes.
A 2019 study in the Journal of Cosmetic Science found that undercured gel layers retained a tacky residue invisible to the eye, and that this residue correlated with earlier chipping in wear testing. Undercured gel is softer than it looks, which is why a manicure can seem finished and still dent or peel within a day.
The fix is mechanical, not magical: keep the hand flat and centered under the lamp, cure one hand at a time rather than crowding both in, and add five to ten extra seconds per layer if your lamp is more than a year old. Wipe the tacky top layer after final cure with alcohol, not water, since water does not remove uncured gel residue.
Filing For Grip, Not For Thinness
A nail file does two different jobs that people often confuse. One job is shaping the nail. The other is creating microscopic texture on the surface so gel has something to grab onto, the same reason a carpenter sands wood before gluing two pieces together rather than gluing a glossy, untouched board.
The mistake is filing too aggressively across the whole nail bed in an attempt to make the surface perfectly smooth. A nail buffed to a glassy shine is actually harder for gel to hold, because there is less surface texture for the polish to mechanically key into. A light pass with a fine-grit file, just enough to remove shine without thinning the nail plate, is the better target.
Over-filing also thins the nail itself, which weakens it over repeated manicure cycles and makes it more prone to breaking at the edges. A simple check: run a fingertip lightly across the nail after filing. It should feel faintly matte, almost like the texture of chalk, not slick like glass. If it still catches light in a mirror-like shine, the gel has less to hold onto than it needs.
Thin Coats, Patient Cure
Painting a fence takes two thin coats, not one thick one, because a heavy coat of paint dries on the surface while staying wet underneath, and it eventually cracks. Gel polish behaves the same way. A single thick coat looks efficient, but the lamp’s light cannot fully penetrate it, leaving a soft, undercured layer trapped beneath a hardened top skin.
Two thin coats, each fully cured before the next goes on, hold up longer than one thick coat even though the finished color looks nearly identical. Thin coats also dry more evenly in tone, since gel pigment can pool unevenly near the cuticle when applied heavily.
The practical habit: load less product onto the brush than feels natural, wipe one side of the brush against the bottle neck before applying, and resist the urge to go back over a spot that looks thin. A second thin coat corrects unevenness better than reworking a wet first coat, which tends to drag and create texture. If a coat looks streaky when wet, let it cure as is; most streaking disappears once gel hardens and before the top coat goes on.
Capping The Free Edge
The free edge, the very tip of the nail where it extends past the fingertip, takes more daily friction than any other part of the nail: typing, texting, opening jars. It is also the spot most people skip when applying polish, brushing color across the top of the nail and stopping just short of the tip.
Capping means dragging the brush over that exposed edge on every coat, sealing the gel completely around the tip like wrapping the edge of a book cover so the pages underneath cannot fray. Skipping this step leaves a raw seam at the tip where gel can catch on fabric or a zipper and begin lifting backward across the whole nail.
The technique takes about one extra second per nail: after painting the top of the nail, tilt the hand slightly and run the brush along the very edge before curing. This single habit is consistently cited in professional nail technician training as the difference between manicures that chip from the tip inward and ones that wear evenly until a full fill is due.
Removing Gel Without Thinning Your Natural Nail
Peeling off gel polish feels satisfying in the moment and does real damage, because gel bonds more strongly to the nail’s top layers than it does to itself, meaning a peeled-off chip often takes a thin layer of nail with it. Over repeated manicures, this is the most common cause of nails that stay permanently thin and flexible.
The soak-off method is slower but protects the nail: buff the shiny top layer lightly to break the seal, saturate a cotton pad with acetone, press it against the nail, and wrap the fingertip in foil for ten minutes. The gel should lift as a softened film that can be gently pushed off with a cuticle stick, not scraped or pried.
The American Academy of Dermatology’s general guidance on nail care advises against peeling or picking off any adhered nail product, noting that mechanical removal stresses the nail plate more than chemical soak-off. A nail that looks ridged, white, or unusually thin after several gel cycles has likely been peeled rather than soaked at some point, and benefits from a break between manicures to grow out the damaged section.
Key Takeaways
Gel manicures fail for mechanical reasons more often than formula reasons. Dehydrating the nail, filing for texture rather than shine, applying thin fully cured coats, capping the free edge, and soaking off instead of peeling account for most of the difference between a three-day manicure and a three-week one. None of this requires new products, only a slower, more deliberate process with what is already in the drawer.
A Quick At-home Checklist
- Wipe each nail with alcohol immediately before polish, touching the nail as little as possible afterward.
- Lightly file to a matte texture, not a glassy shine, to preserve nail thickness.
- Apply two thin coats rather than one thick one, curing each fully.
- Cap the free edge of every coat before curing.
- Add extra cure time if the lamp is older or bulbs look dim.
- Soak off with acetone and foil rather than peeling or picking.
This article is for general information and does not replace advice from a dermatologist or licensed nail professional.
Individual results vary depending on nail condition, product used, and application technique.