

Marcus Delaney, Features Reporter.
You stand in front of the bathroom mirror with wet hair dripping onto a towel you have already ruined, dryer in hand, and you point it straight at your part because that is what you have always done. Twenty minutes later your scalp is dry but the ends are still damp, your arm aches, and the frizz that shows up by lunchtime looks exactly like it did yesterday. Somewhere along the way you started wondering if the dryer itself is the problem.
It usually is not. A 2021 survey cited by the American Academy of Dermatology found that most heat damage reported by patients traced back to technique and distance, not wattage or brand. The fix costs nothing. It just means doing a few ordinary steps in a different order.
This guide walks through the mistakes that show up again and again, in salons and in drugstore aisles alike, and what to do instead.
- Distance matters more than heat setting: holding a dryer six inches away on medium can be gentler than holding it two inches away on low.
- Wet hair is fragile hair: the biggest damage happens in the first sixty seconds, before you ever reach for a brush.
- Cold shot settings are not a gimmick: a short blast of cool air locks the outer layer of the hair flat and is the fastest way to add visible shine.
Why Wet Hair Behaves Like A Different Material

Dry hair and wet hair are not really the same substance to work with. Water swells the outer layer of the hair shaft, called the cuticle, the way a dry sponge swells when it hits a sink. In that swollen state, hair stretches further and snaps more easily under tension, which is exactly what a brush or a fingers-through-hair habit applies.
A 2019 study in the Journal of Cosmetic Science measured hair elasticity wet versus dry and found wet strands could stretch up to 30 percent further before breaking, but did so with far less force required to cause damage at the microscopic level. That is the scientific version of what every hairdresser already tells you: do not attack wet hair like it is dry hair.
The practical fix is sequencing. Towel-dry gently by pressing, not rubbing. Detangle with a wide-tooth comb while hair is damp but not dripping. Only pick up the dryer once hair has air-dried or been blotted to the point where it is cool and damp rather than saturated. That alone removes a meaningful share of daily breakage, according to derm-reviewed guidance published through Mayo Clinic’s hair care materials, without changing a single tool in the routine.
Finding The Right Distance, Not Just The Right Heat
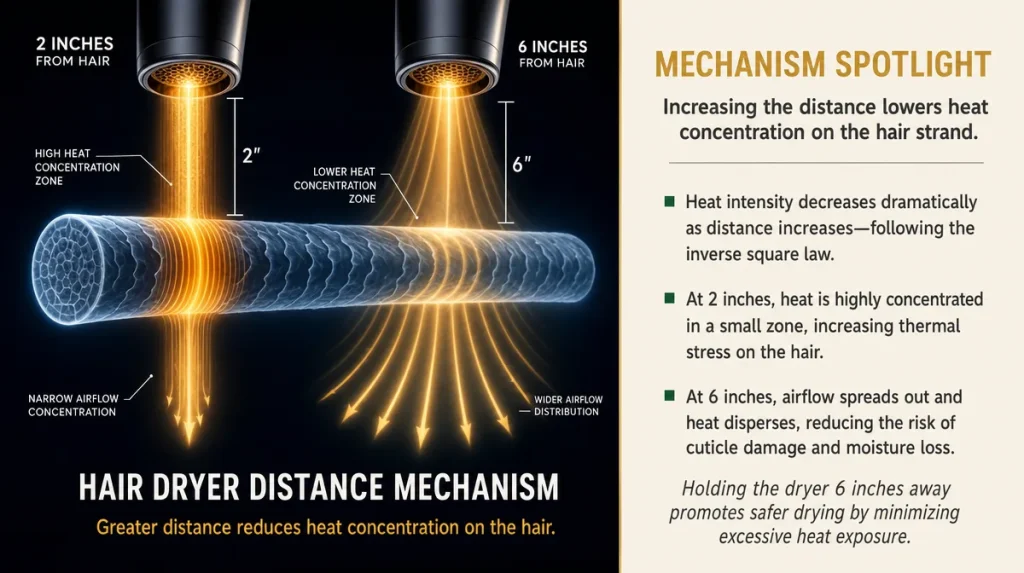
Most people think the heat dial is the only setting that matters. Distance does more work than most readers expect.
Hold a dryer two inches from the scalp on medium heat and you deliver roughly the same thermal load as holding it six inches away on high. The difference is how evenly that heat lands. Close range concentrates heat on one small area long enough to damage the cuticle before you move on; distance spreads the same energy over a wider patch of hair, cooling slightly as it travels through the air.
A simple self-test: point the dryer at the back of your hand from two inches away, then from six. If two inches feels uncomfortably hot within two seconds, that is the same heat your hair is absorbing at that range. Keep the nozzle moving constantly, in a sweeping motion down the hair shaft rather than lingering at the roots. Six to eight inches of distance, kept in motion, is the range most stylists recommend for daily use.
The Section-by-section Method, And Why Skipping It Backfires
Drying hair in one large mass is the single most common mistake, and it explains why the surface feels dry while the layers underneath stay damp for hours.
Hair, especially at medium to thick density, insulates itself. The top layer dries and blocks airflow from reaching what is underneath, the same way a blanket pile dries unevenly if you only aim a fan at the top. Sectioning solves this directly. Clip the top two-thirds up and out of the way, dry the bottom layer first, then release and dry the next section up, working toward the crown last.
This takes slightly longer at the start but finishes faster overall, because no section gets redundant passes of heat on hair that was already dry. It also produces more even texture, since every section gets roughly the same drying time rather than the top getting double or triple exposure while underlayers are rushed. Four sections is a reasonable starting point for shoulder-length hair or longer; two is often enough for a shorter cut.
Reading The Nozzle Attachments Most People Ignore
Many dryers ship with a narrow concentrator nozzle and sometimes a wider diffuser, and both tend to sit unused in a drawer.
The concentrator narrows airflow into a focused stream, which is what lets you direct heat along the hair shaft in the same direction as the cuticle, smoothing it down rather than ruffling it against the grain. Running a dryer with no attachment at all scatters air in every direction, which can lift the cuticle and contribute to frizz regardless of the product applied beforehand.
A diffuser does the opposite job: it spreads air out and slows it down, which suits curl patterns that rely on clumping rather than smoothing. Using a concentrator on curly hair, or a diffuser on hair you want pin-straight, works against the texture you are trying to achieve. Matching the attachment to the goal, not just leaving on whatever was attached at purchase, changes the result more than switching dryers entirely.
The Cold Shot Button And What It Actually Does
Nearly every dryer has a cool-air button, and nearly every bathroom drawer has a dryer where that button has never been pressed.
Heat opens the cuticle slightly as moisture evaporates, which is useful for shaping hair but leaves the surface rougher and less reflective. A short burst of cool air after shaping, held for five to ten seconds over a section, causes the cuticle to contract and lie flatter against the shaft. Flatter cuticle reflects more light evenly, which reads to the eye as shine, the same optical principle behind why a smooth windshield looks clearer than a pitted one.
The habit worth building: finish each section with heat to set the shape, then hit the cold shot before moving to the next section, rather than saving it for one blast at the very end. Hair that has already cooled and set holds a style noticeably longer than hair styled hot and left to cool on its own in the air.
Heat Settings And When High Is Actually Appropriate
High heat has a reputation as the setting to avoid entirely, which is not quite accurate. The mistake is using high heat close to the scalp for long, static stretches, not using high heat at all.
Fine or chemically treated hair generally tolerates less heat exposure before protein damage becomes visible as dullness or breakage, so medium with more distance and movement is the safer default. Thicker or coarser hair often needs higher heat simply to penetrate the strand at all before you run out of water to evaporate, since coarse hair holds more moisture per strand.
A rough guide: if hair is taking more than fifteen minutes to dry on a medium setting with proper sectioning, heat is likely too low for the hair’s thickness, not too gentle. If ends look visibly frizzed or feel brittle to the touch by the end of a session, heat is too high or distance too close for that particular texture. Judge by result, not by a fixed number on the dial, since dial numbers are not standardized across manufacturers.
Heat Protectant: What It Changes And What It Does Not
A heat protectant spray or cream is doing real, specific work, not just adding a drugstore step for the sake of ritual.
Most formulas work by forming a thin barrier that slows the rate at which heat transfers into the hair shaft and by coating the cuticle to reduce friction from the dryer’s airflow and any brush used afterward. A 2020 formulation study referenced in trade literature found that silicone-based protectants reduced measurable moisture loss during heat styling compared to untreated strands, though the effect size varied by hair porosity.
What it does not do is make high heat held two inches from the scalp for thirty seconds safe. Protectant buys a margin, not immunity. Apply it to damp hair before any heat tool, focusing on mid-lengths and ends where damage accumulates fastest and where years of previous heat exposure have likely already thinned the cuticle. Roots see less cumulative heat damage over time simply because that hair is newest.
Judging Results: What Good Drying Actually Looks Like
It helps to know what success looks like before declaring a routine finished, rather than stopping simply because the timer in your head says it should be done.
Run fingers through a section near the scalp and at the ends. Both should feel room temperature, not warm, within a minute of the dryer moving away. Warmth lingering means moisture is still evaporating, which means the section was not actually dry, just dry enough to fool a quick touch.
Visually, dry hair should show some light reflection along the length rather than looking matte and flat, assuming no heavy matte product was applied. If ends look wispy, flyaway, and separated into thin strands rather than falling in a cohesive line, that is frequently a sign of moisture loss from excess heat rather than a styling failure. Give a finished dry style a few minutes to settle before judging it, since hair continues to cool and set for several minutes after the dryer shuts off.
Key Takeaways
Technique changes outcomes more than equipment does, and most damage traces back to a handful of repeatable habits rather than a single bad tool.
A Quick Checklist Before You Dry
- Blot, do not rub, and detangle with a wide-tooth comb before any heat touches hair
- Keep the dryer moving, roughly six to eight inches from the scalp
- Dry in sections, bottom layer first, rather than the whole head at once
- Match the attachment, concentrator for smoothing, diffuser for curl, to the result you want
- Apply heat protectant to damp mid-lengths and ends before styling
- Finish each section with a short cold shot to set shape and add shine
- Judge doneness by touch and temperature, not by the clock
This article is for general information and does not replace advice from a licensed stylist or dermatologist.
Individual results vary depending on hair type, thickness, and prior styling history.